How to Restore Old Photos Without Losing Facial Details
A practical guide to restoring damaged, faded, or black-and-white old photos while keeping every person's face recognizable — scanning, AI workflow, review checklist, and honest limits.
On this page
Restoring an old photo is easy. Restoring it so your grandmother still looks like your grandmother is the hard part. Most one-click restorers remove scratches beautifully and then quietly redraw the faces — smoothing wrinkles, softening features, and turning family members into plausible-looking strangers.
The fix is not a better magic button. It is a workflow: scan the print properly, repair damage before touching faces, use a restoration tool that treats identity as a hard constraint, and review the result against the original before you accept it. This guide walks through each step, and shows where DeepKolor's AI old photo restoration tool fits in — it is built specifically around the identity-preservation problem.
Why do restored old photos sometimes stop looking like the person?
There are three recurring reasons, and almost every disappointing restoration comes from one of them.
Generative reconstruction guesses. Modern AI restoration is generative: when the model sees a blurred or damaged face, it does not "sharpen" the original pixels — it generates new ones that look statistically plausible. If the constraint is weak, the model draws an average face informed by the blur, not the actual person. That is why the same tool can nail a sharp 1970s portrait and fail on a soft, out-of-focus face from the 1940s.
Overprocessing. Restoration apps often stack denoising, skin smoothing, and sharpening into one pass. The result is the familiar waxy look — poreless skin, smudged texture, plastic highlights. The face is untouched in shape but no longer looks like a photograph of a real human being. Restoration forums are full of exactly this complaint about free one-tap apps.
Beautification defaults. Some tools quietly "enhance" faces the way phone cameras do: slimming jawlines, brightening eyes, smoothing age lines. On a recent portrait this reads as flattering. On a 1965 group photo it erases precisely the details that make a face recognizable — the wrinkles, the mole above the lip, the asymmetry of a real smile.
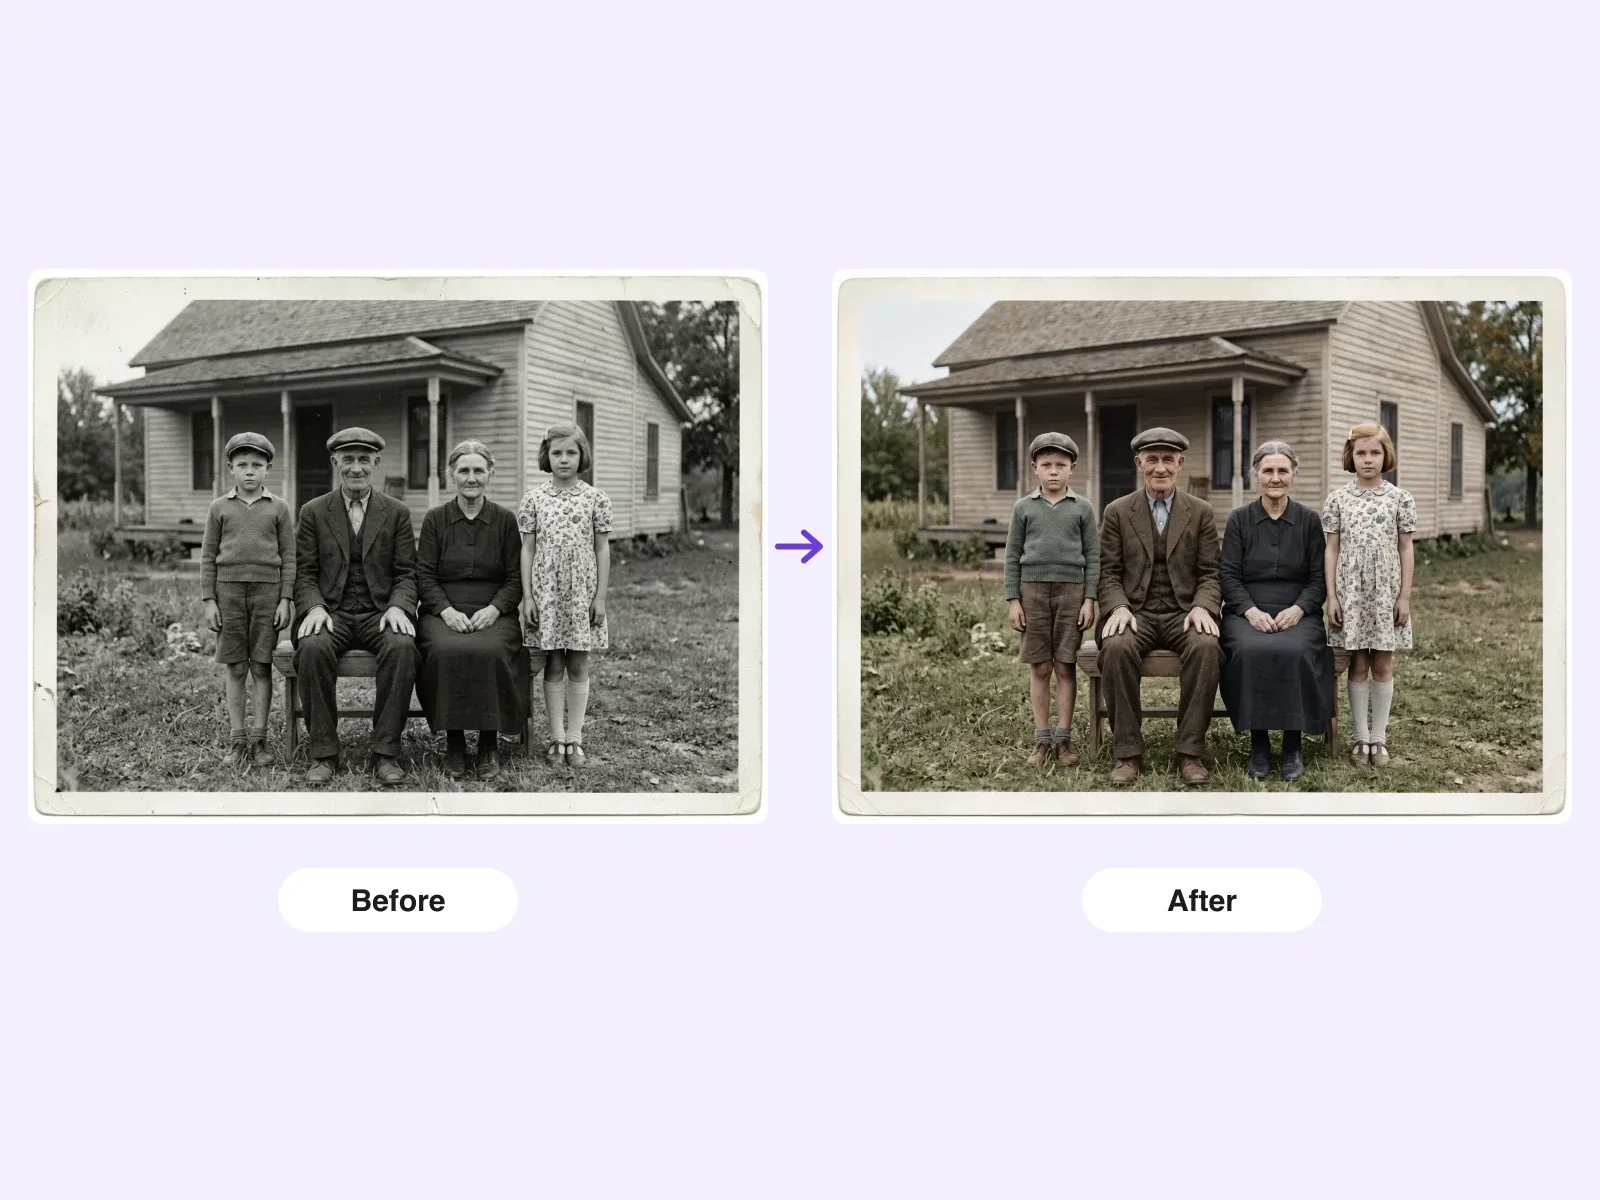
The lesson: choose a restoration approach where identity preservation is an explicit rule, not a lucky outcome. Before-and-after comparison from DeepKolor's restoration workflow — damage and blur removed, face shape and defining marks kept:
How should you scan or photograph an old photo before restoring it?
No restoration can recover detail that was never captured. The scan is the foundation, and it is where most do-it-yourself restorations quietly fail.
Use a flatbed scanner at 300–600 dpi. This is the range professional restorers recommend for prints you intend to restore and reprint. 300 dpi is enough for a same-size reprint; 600 dpi gives restoration tools headroom to rebuild a face at larger-than-original size. Scanning below 300 dpi throws away facial detail before any tool can protect it.
Include the whole frame, including damaged edges. Torn corners, creases, and stained borders give the restoration tool context. If you crop to the faces before uploading, torn and missing regions cannot be rebuilt to match the surrounding texture.
Scan flat and evenly lit. If you must photograph the print instead of scanning it, use diffuse light from two sides, keep the camera parallel to the print, and avoid flash — glare hides texture and gets interpreted as damage.
Save as JPG, PNG, or WebP without re-compressing. Screenshots and messaging-app compressions add artifacts that look like noise to a restoration model. Move the original scan file directly, not through chat apps.
A scanned original in good condition can be enlarged further with an AI image upscaler when you only need more resolution — but upscaling alone does not repair damage or rebuild faces. For damaged prints, restoration comes first.
How do you restore an old photo without changing the face?
With a good scan in hand, the restoration itself takes minutes. The workflow below follows DeepKolor's old photo restoration tool, but the same order applies to any tool you evaluate.
Step 1: Repair the damage first
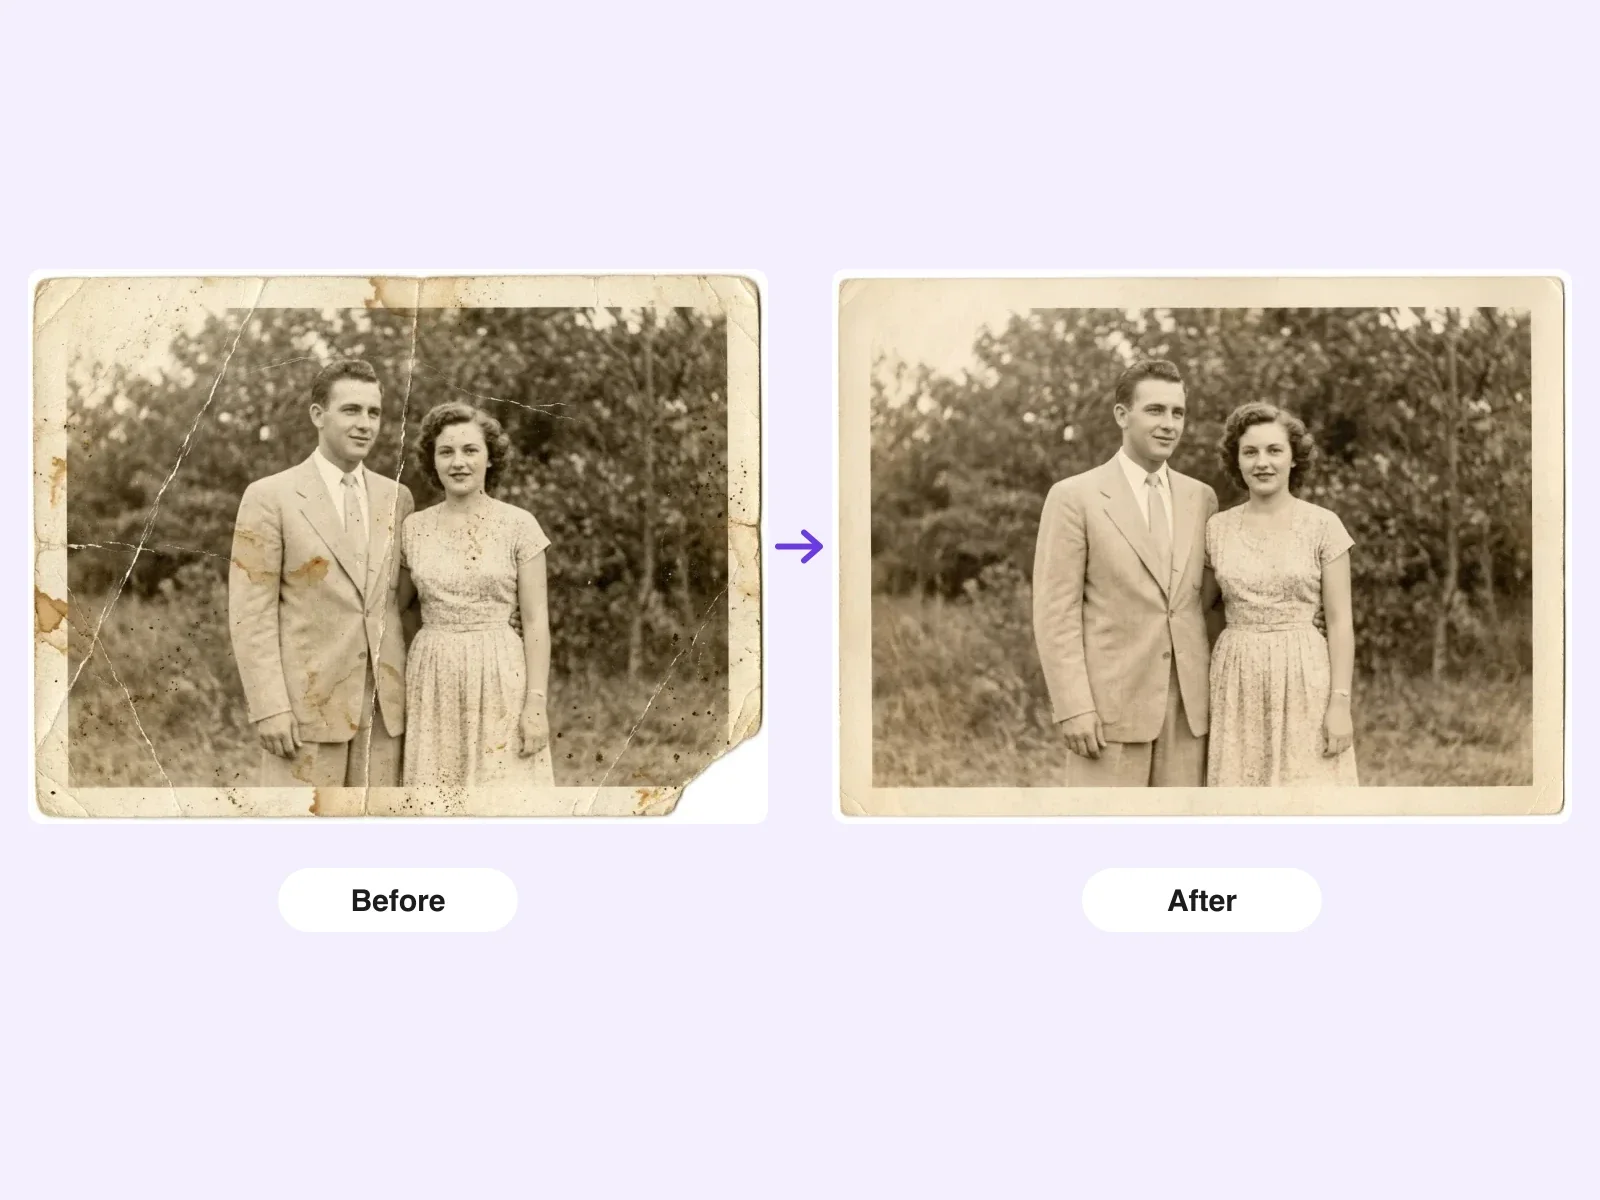
Scratches, creases, stains, dust, and missing corners are repaired before anything else. Damage repair is the most reliable part of AI restoration: the model rebuilds torn regions to match surrounding texture and lighting. Doing it first matters for faces too — a scratch running across a cheek will otherwise contaminate the face-rebuilding step. Here is what damage repair alone can recover:
Step 2: Rebuild faces under an identity constraint
This is the step that separates a restoration from a face swap. The tool you use must be explicitly instructed — by design, not by your prompt — to keep face shape, proportions, expression, and apparent age unchanged, including wrinkles and defining marks. DeepKolor's tool runs every restoration under this constraint: eyes, expression, and hair are rebuilt with detail, but the person's underlying structure stays fixed. Group photos get the same treatment for every face in frame, not just the largest one.
Step 3: Correct fading and color only after repair
Faded, yellowed, or orange-shifted color prints are rebalanced after the damage work, recovering tonal depth while keeping the era's authentic look. For black-and-white photos, colorization should be optional and off by default: a muted, era-appropriate palette applied to a clean, repaired image — never automatic neon saturation. If you want the photo to stay black-and-white, the tool should simply correct tone and contrast.
Step 4: Choose output resolution for the end use
Pick 1K for a quick preview or sharing in a family group chat; pick 2K when the goal is a framed reprint. The original aspect ratio and framing should stay untouched — a restoration that crops to "improve composition" is no longer a restoration.
What should you check before accepting a restored photo?
Never print or share a restoration you have not compared against the original side by side. AI output is probabilistic, and even a well-constrained tool deserves a final human check. Run this checklist:
- Face shape and proportions. Compare each face against the original. Cheekbones, jawline, the distance between eyes — these should be identical, not "similar."
- Defining marks. Wrinkles, moles, scars, and hairlines carry identity. If a mark disappeared, the tool overstepped.
- Apparent age. A 70-year-old should not come back looking 45. Smoothing is the most common identity failure.
- Every face in group photos. Check the small faces in the back row, not just the couple in front. Weak restorers fix the largest face and average the rest.
- Reconstructed regions. Torn or missing areas are inferred content. Review them carefully before treating the photo as a factual record.
- Vintage character. Clothing texture, background, and the period look of the photo should survive. A restoration that looks like a modern phone photo of a costume reenactment has gone too far.
Can AI restore a blurry face in an old photo?
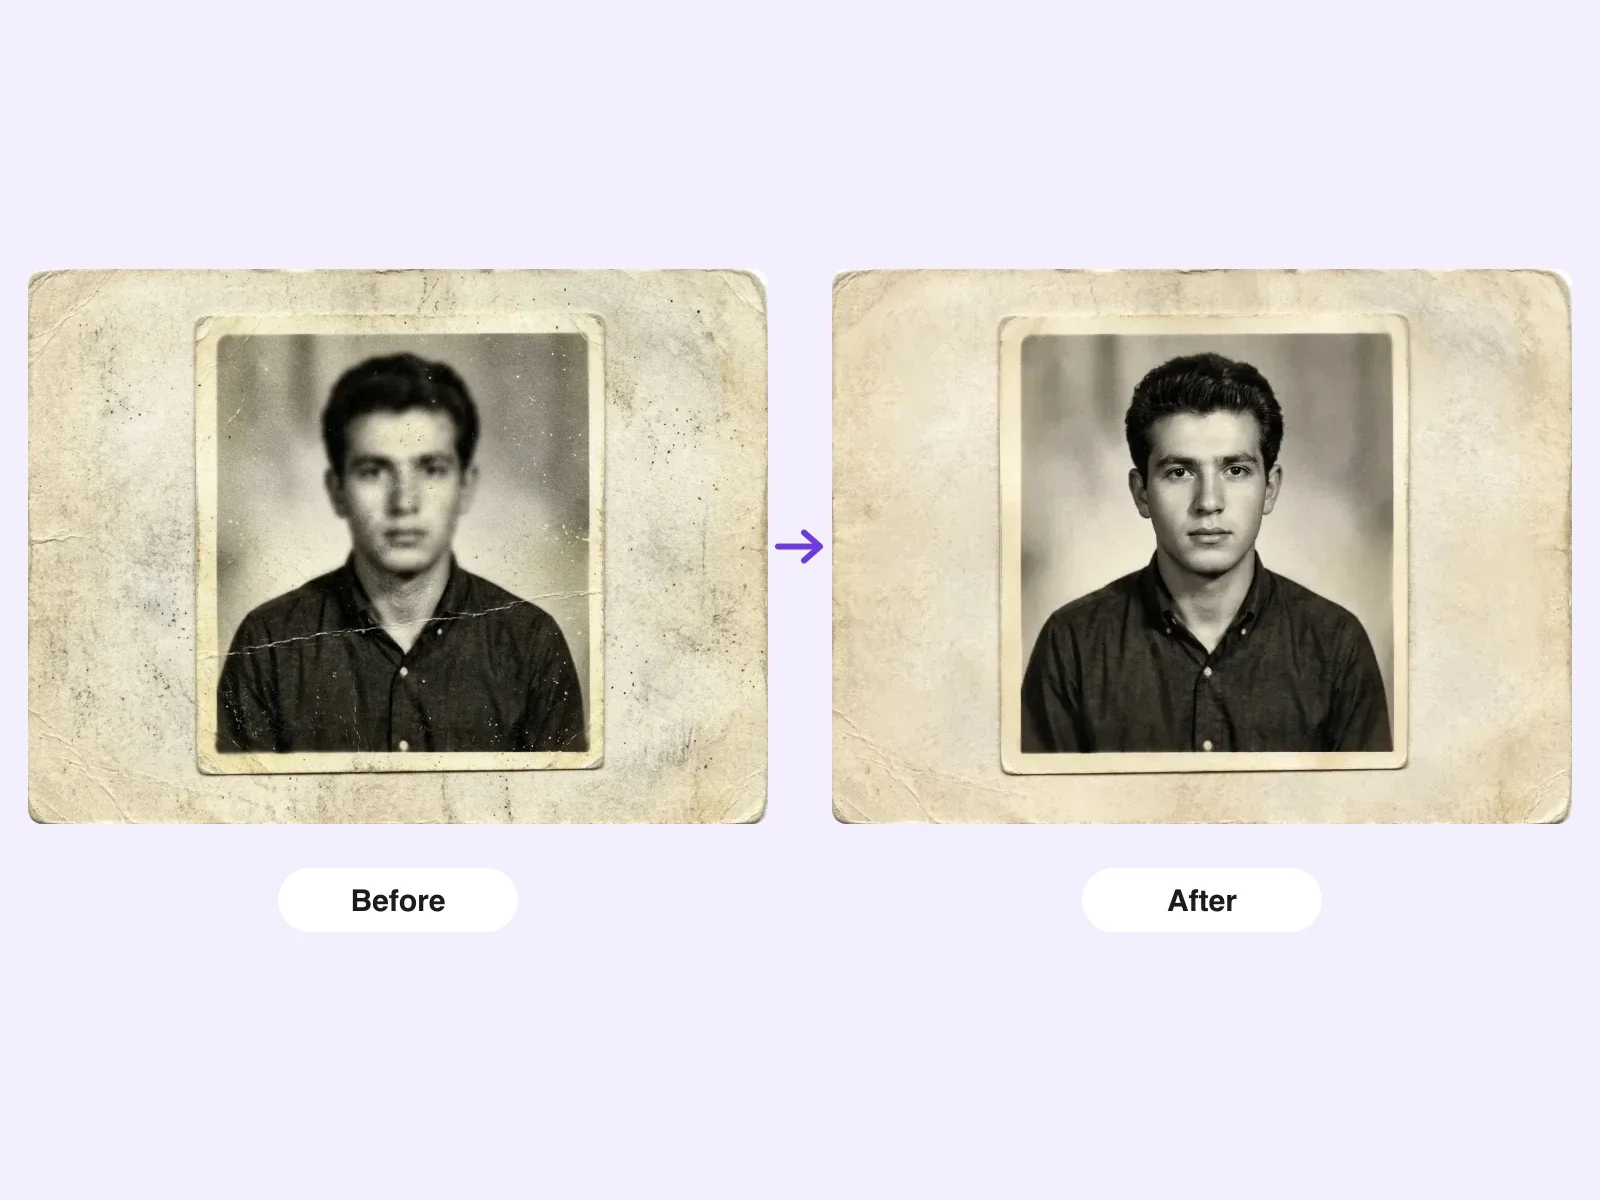
Often, yes — within limits worth understanding. When a face is soft because the print is small, the film was grainy, or the shot was slightly out of focus, an identity-constrained restoration can rebuild eyes, expression, and hair with real detail while keeping the underlying structure. This is exactly the case DeepKolor's face-rebuilding step is designed for, and it handles the classic "soft, mushy face" of old group portraits better than pure sharpening, which only amplifies grain.
The honest limit: restoration cannot invent information that is not there. If a face is five pixels wide in the original, or a whole region is physically missing, the rebuilt detail is a well-informed inference, not recovered fact. The right expectations: a blurry face becomes a clear, recognizable version of the same person — it does not become a forensic reconstruction of exactly what the camera never captured.
When should you choose manual restoration instead of AI?
AI restoration is the right default for family archives: fast, affordable, and good enough for framing and sharing. Manual restoration — a skilled Photoshop restorer or a professional service — is still worth considering in three situations. First, photos of documentary or legal significance, where every detail must be traceable to the original rather than inferred. Second, severely damaged heirlooms where you want editorial control over every rebuilt region. Third, faces so small or damaged that you want a human deciding what the person actually looked like, using family reference photos. For everything else — faded wedding prints, scratched childhood portraits, yellowed snapshots — the AI workflow above will get you a printable result in minutes.
The short version
Scan at 300–600 dpi with the whole frame visible. Repair damage before faces. Use a tool that enforces identity preservation instead of relying on luck. Keep colorization optional. Compare against the original before you print. Follow those five rules and your restored photos will show the same people — clearer than they have been in decades. You can run the full workflow, from damage repair to 2K output, in DeepKolor's AI old photo restoration tool.
Frequently asked questions
What resolution should I scan old photos at for restoration?
Scan prints at 300 dpi minimum for a same-size reprint, or 600 dpi if you want restoration headroom and possible enlargement. Below 300 dpi, facial detail is lost before restoration even starts. Avoid re-compressing the scan through messaging apps.
Will the restored faces still look like my relatives?
With an identity-constrained tool, yes — face shape, proportions, expression, and apparent age are kept unchanged, including wrinkles and defining marks. AI output is still probabilistic, so always compare the result against the original before printing or sharing.
Does colorizing an old photo change the faces?
It should not. Colorization happens after damage repair and adds only color on a clean image — facial structure is untouched. If a colorized result looks like a different person, the tool is not preserving identity; re-run it or choose a different one.
How much does AI old photo restoration cost?
It varies by tool. On DeepKolor, a restoration runs on credits — a 1K result costs 6 credits and a 2K result costs 12 — and new accounts get free credits to try it. Professional manual restoration typically costs far more per photo and takes days instead of minutes.
Can a photo that is torn in half or missing a corner be restored?
Yes. AI restoration detects torn or missing regions and reconstructs them to match the surrounding texture and lighting. Large missing areas are inferred content, so review reconstructed parts carefully before treating the result as a factual record.
Is an AI-restored photo suitable as documentary evidence?
No. Restored regions — especially reconstructed damage and rebuilt facial detail — are plausible inferences, not recovered facts. For genealogy records and historical archives, keep the original scan alongside the restored version and note that the image was restored.
Related posts
AI ID Photo Maker: How to Create Passport-Ready Photos at Home
Learn how an AI ID photo maker works, which documents it can prepare, and how to avoid the most common rejection reasons when you create passport, visa, or ID photos online.
How to Make a Risograph-Style Poster Without a Printer
The riso look comes from paper, two inks, halftone plates, and whitespace acting as one system. What risograph posters are, why they are trending in 2026, and how DeepKolor's mono-print-poster skill generates one from a single prompt.

What Is an AI Design Agent? Definition and How It Works
An AI design agent takes a brief, creates the visual, and edits with you in chat. See how it differs from image generators and when to use one.